The Refrigeration Cycle - In Layman terms.... hopefully... hehehehe :DDDD
One
of my ex-colleagues from Trane mentioned to make entries from my blog as
non-technical as possible. Immediately upon reading the comment on my Facebook
post, I started pondering about what to write that could possibly be written in
Layman terms. After a day or so thinking about it, still I didn’t have a topic
in mind.
However,
last Saturday, when my boss and I had a meeting with an owner of a mall in Bacolod
City; during the drive from the hotel to the meeting location, I began to think
again what could be an interesting topic that could fit what my ex-colleague
described then suddenly I found it! While I was discussing with my boss the
details of the size of the equipment for the mall it came to me: what about the
refrigeration cycle???
At
first you might react
“OMG, WTF is a refrigeration cycle! Non-technical? Are you kidding me??? F@$ck you!”
but I just want you to know that the intent here
is not to find a “non technical” topic but rather make a technical topic non
technical that even an elementary school student would understand. If ever you've read this blog entry and still you find it hard to understand, then
please email me about it and I will do my best to explain it again to you in
another way.
- A person learns most effectively by sight
- A person learns most effectively by sound
- A person learns most effectively by touch
I
understand that in order for one to effectively convey information to an
audience, one must either:
1.
Display all of the learning techniques above or
2.
Know first know how the target audience effectively takes in information then
proceed with whatever fits their learning patterns.
Now,
since the platform to which I do this is on the internet, the only possible
avenues I have would be sight and sound; since I am new to this blogging world,
please allow me to apologize because as of the moment I could not add any
“sound” driven tool and the only thing I have would be visual.
Now, enough said, Let’s get it
on!!!!!!!
First we go back to our
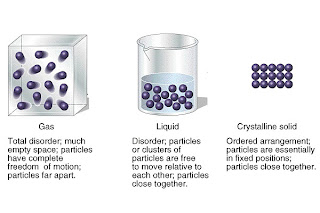
elementary school days and talk about the properties of a matter. In school we
were taught that there are three different phases of a matter namely solid,
liquid and gas. Furthermore, we were also taught about the arrangements of the
so called “atoms/particles” in each of these phases... I know that there are
other types like plasma and whatnot but let’s just make it simple and deal with
this three only.
For all you visual learners:
Hello!
I won’t explain much of this
anymore since we all know this already.
Anyhow, now we go to the main
topic:
REFRIGERATION
CYCLE
First we look at the
components one by one and I will try to explain it piece by piece the simplest
I way I could.
A.
EVAPORATOR
The function of this component
is as what the name defines; to evaporate. The liquid refrigerant in the
evaporator boil and turn in to gas because it absorbs heat from whatever source
it is intended for.
Now, since all of that liquid
turned into gas then it would be a waste if we just let that be right? So, how
do we turn it back to liquid so that we could use it over and over again?
Then here we go to the purpose of the “refrigeration cycle”. Since changing phases of matter couldn’t be done naturally in a controlled setup as it happens only naturally (snow, water, hail, etc.) then the purpose of the cycle is to make it happen so that we can control and manage it.
Going back to the question “how do we turn the gas back into liquid so that we could use it again and again?”, we look back to the states of matter we discussed earlier.
Since, at gaseous form, the
particles/atoms are far apart from each other, then in order get it back to
liquid then we have to find a way to move it closer right? In more simple
terms, since the dots are separated as shown above in gaseous form, we then
have to do move the dots closer so that it would be arranged as what is shown
in liquid form.
There it is then, in order for
us to move the atoms/particles closer, we then need to have another component –
the main component to make the magic happen:
B. THE COMPRESSOR
Now, since there are different
types of compressors, I’ll just show it to you so that you can classify it by
sight.
Just know that the main purpose of this component is to move the particles/atoms of the refrigerant closer together so that it could be turned back into liquid easily. Coincidentally, since the process of compression increases the pressure of whatever gas it is compressing then this component also adds heat to the refrigerant increasing its temperature as well.
Just know that the main purpose of this component is to move the particles/atoms of the refrigerant closer together so that it could be turned back into liquid easily. Coincidentally, since the process of compression increases the pressure of whatever gas it is compressing then this component also adds heat to the refrigerant increasing its temperature as well.
Think about this for a while,
since were done with the first two parts then let’s summarize first what
happened to the refrigerant:
a. The
refrigerant boiled in the evaporator increasing its temperature.
b. The
refrigerant was compressed in the compressor increasing its pressure and
temperature.
In a sense, what we did to the refrigerant on the first two components is that we added heat and increased its pressure and thus in order for us to get it back to the liquid form then the next components must:
a. Decrease the temperature
b. Decrease
the pressure and temperature
C.
CONDENSER
This is basically the same as the evaporator but instead of adding heat to the refrigerant, its purpose is to take away heat from the refrigerant (the heat we added in the evaporator and compressor). This component is actually where the magic happens and here we find out that the refrigerant finally goes back to liquid as what we’ve intended for in the first place. Since we’re transferring heat, then where does it go? Well, it depends on what type of machine you have. With a water cooled system then it’s transferred to the cooling tower and with an air-cooled system then as what the name implies it is transferred to the air.
Ok so, are we done? Did we
finish the job? It’s back to liquid right?
Well, sad to say, not yet!
We discussed earlier that
after the evaporator and compressor we need to do two things but this time lets
expand what it further:
In order for us to use the
refrigerant over and over again and fulfil the cycle’s purpose, after the
evaporator and compressor, we need to:
a. Decrease the temperature to the point we can turn it back to liquid.
b. Decrease
the pressure and temperature so that we could re-use it.
Ok, so actually, when the refrigerant is inside the condenser we’ve accomplished item a. already. How do we accomplish item b. then?
Now we move to the last
component of the basic refrigeration cycle:
D. THE EXPANSION/METERING DEVICE
Basically, before this it has
been explained already but here it is again just in case:
The job of this final
component is to decrease the pressure and temperature so that we could re-use
it. One other function of this is that this final component also acts as a “metering
device” so that it could control how much refrigerant will go into the
evaporator. Think of this device as the guard/bouncer at a dance club that
controls how much people goes into the club depending on how many people the
management wants the club to be filled of.
WOW that’s a relief, were done!
Well, I hope you’ve enjoyed
this entry and I just want you to know that I did my best to make this as
simple as possible. Please email me at coolmoako@blogspot.com
should you have any questions/clarifications or whatever it is that you would
want to communicate with me about and I’ll find time to respond to your mail/s.


Nice way your write and cool content too and I really found this information to be informative.
ReplyDeleteHVAC Philippines - Stuff from a Trane Engineer
https://www.youtube.com/watch?v=TbldW3owD4A
Can your team can heat weld the best refrigeration seals:
to replace on all branded refrigerator door:
https://storify.com/FridgeSeal/refrigeration-franchise-employment-work-for-yourse
Is it correct you have current customers that need their refrigerator door gasket re-placed?
Create your own Refrigeration Gaskets Lengths into Completed Refrigerator Gaskets with the Portable Fridge Gasket Welder Kit.
It is suitable for Phillips, LG, Kelvinator, Hoover, Westinghouse, Fisher & Paykel, Samsung, Whirlpool, GE, Ignis, Bosch, Fridgidaire, Kenmore both domestic and commercial.
We can weld the gaskets on Phillips, LG, and nearly all brands.
We have customers try it on Phillips, LG, Kelvinator, Hoover, Westinghouse, Fisher & Paykel, Samsung, Whirlpool, GE, Ignis, Bosch, Fridgidaire, Kenmore fridges and freezers. If you need to manufacture gaskets for any of these brands Fisher & Paykel, Samsung, Whirlpool, GE, Ignis, Bosch, then our machine is for you.
Just search GOOGLE you will find our refrigeration gasket welder machine and website online. Just search for Portable Refrigeration Gasket Welder Kit.
http://tiny.cc/RGWK RefrigeratorGasketWelderKit
http://tiny.cc/FSWK FridgeSealWelderKit
Thank you.
ReplyDelete